A few people have asked me why, when you apply a flakie topcoat over different colours, can they take on different sheens? Luckily, there’s a moderately simple explanation!
Light and colour
When light hits an object, some gets absorbed and some is reflected. The light that’s reflected hits your eye and tells you what colour it is. For example, when you see a red apple, the apple is actually reflecting red light into your eye, while absorbing all the other colours.
When an object reflects all colours of light, we see it as white, whereas when an object absorbs all colours of light, we see it as black. This is why black things get hotter in the sun, why lighter coloured cars are cooler in summer, and why you need sunglasses in the snow!
Flakies
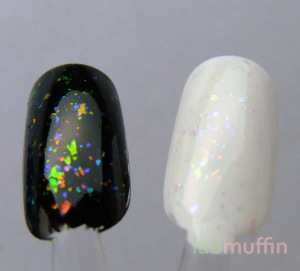
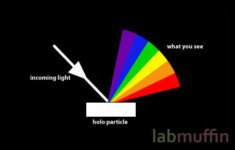
Flakies are transparent particles which reflect certain colours at certain angles. With any flakie topcoat, it’ll stand out more over a black or dark base, since the colour reflected by the flakies isn’t lost amongst all the other colours, like it would be on a white or light base (this is Australis Speck-tacular):
Massive difference!
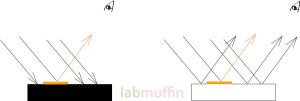
This is what’s going on – the orange thing is the flakie, the white/black box is the nail, the arrows represent light and the terrible monster in the corner is my terrible drawing of an eye (really should’ve labelled it, sorry!):
The flakie colours are lost in amongst all the white! Additionally, since flakies are clear, there’s some white light bouncing through the flakie as well, making the flakies themselves look lighter in colour.
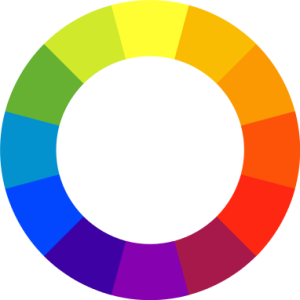
A multicoloured flakie topcoat like Speck-tacular will look different over coloured different bases because different colours will stand out. This is a colour wheel:
Colours opposite each other are called complementary colours. When placed next to each other, they stand out and make each other look brighter.
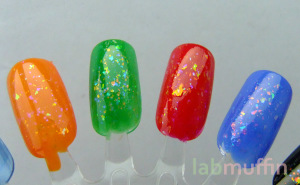
Here are Speck-tacular swatches over different bases:
Over orange, you can see the subtle blue flakes; over green, everything pretty much stands out, although the orange-red is probably the first thing you see; over red, the green-yellow is obvious, and over blue, an orange sheen is the most obvious.Of course, the amount of each colour flakie in your multi-coloured flakie polish also makes a difference.
The bottom line: If you want a more subtle effect, pick a colour of flakie that’s near your base colour on the colour wheel, and use a lighter coloured base; if you want your flakies to really pop, use a dark base and pick flakies opposite it on the colour wheel.
Hope you liked that explanation!
I’m sorry I’ve been a bit MIA – I’ve been super busy with uni work and have so many blogs to catch up on! My final PhD seminar is next Monday and I’m woefully underprepared, and I have 469 first year chemistry questions left to mark… argh!





this is very interesting! makes me think more about my layering options!
Thanks for the awesome and in-depth explanation! And good luck with the marking too!
Loved this explanation. You are awesome.
I was totally waiting for you to explain this 🙂 Just to see if I was right…I studied biophotonics so I know about light and lasers way too much…>.<
Look at you getting your science on!! ;P Great post, very informative! 🙂
This is a great post! I LOVE flakies over black x
Thanks for the flakie lesson. 🙂
Great read, as always ^_^
Awesome post 😉
I just got that awesome “light bulb” feeling when sciencey knowledge totally clicks–thanks, Michelle!
awesome post 🙂
This makes so much sense! Thank you for the explanation!
Your blog is awesome!! I am NPA AND a PHD student(a lot of letters!) and I think you and your blog are awesome!